In the past 25 odd years I have made two workbenches, though the first one is still a work in progress. A couple of years ago, in response to a query about benchmaking, I posted a short history of the still unfinished bench up until that point on the Oldtools mailing list. That story, along with a number of other bench stories were archived at Rick Manderscheid's archive of bench success stories. That link stopped working a while back, but the page has been saved in the archive of the Internet's own Wayback Machine and you can find it here.
Here, I'll update you on the saga of that bench and tell you a bit about my second bench.
Share this site:

LINKS email me
|
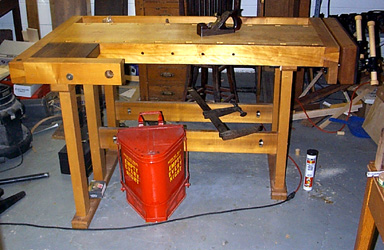
My First BenchMy first bench was a european style bench with a tail vise and a shoulder vise. The latter has yet to be installed (as you can see in the photos). The tail vise, on the other hand has been installed several times, or to put it a bit differently, I have had three different tail vises on the end of my bench. More on that later. The bench itself is made mostly of maple with some birch, poplar and walnut for a part here or there. It is the standard L-shape, with a tool tray along the rear of the bench. The top is laminated maple with maple endcaps fastened crosswise, bolted in only one location to allow for seasonal wood movement. The legs themselves are a trestle secured by bolts through the stretchers. A picture of the bench can be viewed at the top of this page. So why have I used three different tail vises on one bench? Since I have two rows of benchdog holes running down the bench on either side of the top, I wanted a vise with two holes corresponding to each row of dogholes. To do this I made a wooden jaw to hold the dogs, and then attached it to a standard face vise to provide the movement and clamping action. The result was pretty terrible racking whenever I used only one dog, since the vise screw did not line up with the dog holes. I tried again with a more substantial quick release vise I found at a garage sale. This was more serviceable, but the racking was still there. Then I got an Emmert patternmaker's vise. This vise was not really appropriate to this bench. So I started building a new bench, which turned out to need a vise for the front in addition to the Emmert. I decided to use the quick release vise from my old bench and to spring for the Veritas twin screw vise to replace it as the tail vise on my first bench. As I said, I bought the Veritas twin-screw for the tailvise. The only trouble was it needs six inch deep front and back jaws and my endcaps and old vise jaw were closer to four inches. The instructions suggest just adding a new back jaw over the old end of the bench, but it seemed to me that this would make the bench look ungainly. Instead I proceeded to mortise and relaminate the existing endcap to a new depth of 7 inches without increasing its thickness. The trick was to do this without damaging the dovetails that hold the endcaps to the bench. And, while I was at that, I decided to make an entirely new front jaw for the vise rather than modify the old one. You can see how that turned out in the photos above and below, especially the view from the front of the workbench.
A Modification to the Twin-screw Vise I wrote most the above several (actually many) years back. Since then I have inherited and set up my father's metal
lathe. This allowed me to cut down the screw I had for use in the shoulder vise, and finally to
install it more than 15 odd years after commencing construction of the bench. It also allowed me to
make some modifications to the Lee Valley Veritas vise in light of experience using it for a few
years. I'd been overall happy with it, but I was also troubled by a few inconveniences. Since the twin screws on
the vise had to be somewhat close together to fit on my bench, I had to shorten the lengths of the
handles to keep them from hitting one another when they turned. Even then, I had to be aware of how handles the
were oriented relative to one another to keep from bashing them against each other or against my hands. It is hard to say which was more frustrating. Needless to say, I got tired of this and I wished I could use a longer handle for some more leverage. It seemed like a design flaw for which there ought to be an easy fix. So I commenced to scheming.
I wrote most the above several (actually many) years back. Since then I have inherited and set up my father's metal
lathe. This allowed me to cut down the screw I had for use in the shoulder vise, and finally to
install it more than 15 odd years after commencing construction of the bench. It also allowed me to
make some modifications to the Lee Valley Veritas vise in light of experience using it for a few
years. I'd been overall happy with it, but I was also troubled by a few inconveniences. Since the twin screws on
the vise had to be somewhat close together to fit on my bench, I had to shorten the lengths of the
handles to keep them from hitting one another when they turned. Even then, I had to be aware of how handles the
were oriented relative to one another to keep from bashing them against each other or against my hands. It is hard to say which was more frustrating. Needless to say, I got tired of this and I wished I could use a longer handle for some more leverage. It seemed like a design flaw for which there ought to be an easy fix. So I commenced to scheming.
Another modification came about because I never liked the cheesy plastic cover. I bought a piece of 4 inch diameter copper pipe to make a replacement for it. But before I had time to get the project finished, Veritas came out with a new cast cover; I purchased it from them rather than make my own. The copper pipe was eventually used to make a Ram Pump for my cabin's spring box. At some point I'll have it documented on my Timberframe cabin pages.
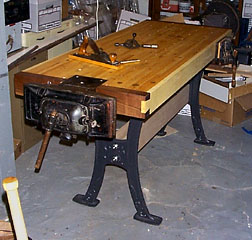
My Second BenchWith Cast Iron Legs and a Turtleback Emmert ViseAs I said, my newly scavanged Emmert patternmaker's vise needed a bench. Lucky for me, I was able to pick up a laminated maple benchtop for about $35 at an auction. All I needed now were legs and skirts to go around the ends and front and rear edges. Rather than build another trestle, I sprung for a set of cast iron legs from Lee Valley, which together with some maple stretchers made a fine trestle with a bit less work for me. For the bench to function well with the vises, it needed dogholes, something not supplied with the benchtop, at least not where I wanted them. But mortising traditional square holes was going to be a lot of work. Instead I used a brace and bit to drill 3/4 inch holes in the top, lined up with the dogs on the vises, and spaced 6 inches apart. These holes fit round brass bench dogs I bought also through Lee Valley.
I planed the top as well as I could to remove the polyurethane it came covered in, and to get out the marks of years of use in a Junior High School (the previous home of the main bench slab). Junior high kids being what they are, I kept running into embedded nails. My Spiers infill smooth plane planed through them well enough, but not without nicking the blade. So I ended up quitting while there was still some siginficant tearout in the bench top. Then I covered the whole thing with three coats of tung oil, the first thinned with naptha, the second full strength, and the last a coat of "boiled" tung oil including driers for a somewhat harder finish. Emmert Patternmaker's VisesIf you are unfamiliar with patternmaker's vises, they are really marvels of versatility. They allow a patternmaker to hold the work at almost any angle in almost any position. That's because the vise both swings upward on its mounting bracket, and turns 360 degrees. Combining the two modes creates a large variety of clamping positions. The vise also has dogs to allow work to be clamped between the vise dogs and dogs set into the dogholes in the tabletop. The accompanying pictures should illustrate some of the positions that the vise can hold work.
The vise also allows clamping of a wide range of shapes. The vise's he front jaw skews to accept odd shaped work. And to top that off, Emmerts came with a tilting plate to further increase the variety of odd shapes that could be held in the vise. Usually these are missing, so it is lucky that Patrick Leach has gone into production making replacements. A picture of the tilt-plate is displayed immediately below.
The Emmert on my bench is the old style model, affectionately known as the "turtleback" model. Newer Emmerts have a different sort of cam arrangement for skewing the front jaw and hence do not require a cover over the mechanism. John Gunterman has a picture of one of those on his "Shavings" Homepage . More importantly, his page has the instructions for mounting the second model on a workbench, as well as some other nice workbench related stuff. |
ˋ 1999, 2009 msv@unlserve.unl.edu
 Back to my Homepage.
 My Timberframe Cabin Page.
  Old machinery interests.
 A page of my projects.
 Oldtool resources on this site (including links to Ohio Tool, Atkins and Goodell-Pratt catalogue pages).
 My Old House Page.
 Woodworking links to other sites.
 My Philosophy Page.
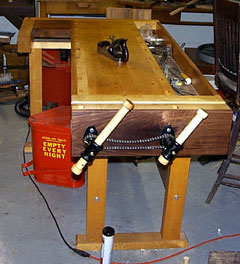
 It occured to me that I would be better off if the handles were staggered so that they were
different distance from the bench. So after giving it some thought, I turned an extension piece
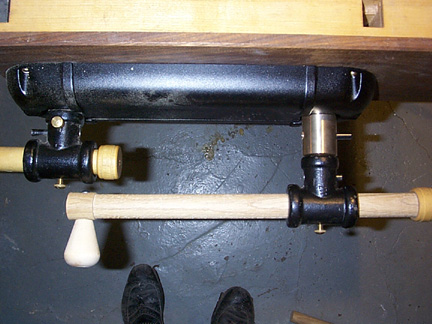
out of brass on my father's metal lathe. The second photo shows the part pretty well. It has a
hole in one end that fits over the existing screw shaft and attaches with a pin in the same way the
old crank casting fit on this shaft. (The pin is left part way out as Lee Valley recomends so that
excessive force will break the pin and not some more important part.) On the other end, I turned
down the diameter of the piece so that is is the same as the shaft diameter so that it can fit inside
the crank casting just as the screw shaft used to. This section too was drilled for a pin, which
lines up with the other one. I lucked out and got both my holes to align perfectly with the
existing holes in the original vise parts. Everything works very well. The brass piece is beefy
enough to work fine without any noticeable flex or play. I can now put as long a handle as I want
on the screw with the adapter piece. I'm satisfied and happy with the resulting ability to turn the handles continuously.
It occured to me that I would be better off if the handles were staggered so that they were
different distance from the bench. So after giving it some thought, I turned an extension piece
out of brass on my father's metal lathe. The second photo shows the part pretty well. It has a
hole in one end that fits over the existing screw shaft and attaches with a pin in the same way the
old crank casting fit on this shaft. (The pin is left part way out as Lee Valley recomends so that
excessive force will break the pin and not some more important part.) On the other end, I turned
down the diameter of the piece so that is is the same as the shaft diameter so that it can fit inside
the crank casting just as the screw shaft used to. This section too was drilled for a pin, which
lines up with the other one. I lucked out and got both my holes to align perfectly with the
existing holes in the original vise parts. Everything works very well. The brass piece is beefy
enough to work fine without any noticeable flex or play. I can now put as long a handle as I want
on the screw with the adapter piece. I'm satisfied and happy with the resulting ability to turn the handles continuously.
 The old vise (on the new bench). This was originally used on my first bench as I explained, but now sits on the right end of the new bench where it serves as a quick release face vise. It also opposes a row of old bench dog holes in the top the the bench.
 The vise in horizontal position which will allow clamping between the bench dogs and vise dogs.
 The vise positioned vertically.
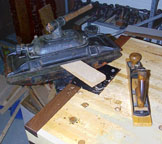 The vise tilted up and rotated 45 degrees.
 This is the new copy of the original Emmert tilt-plate that I got from