
LINKS
email me Back to My Homepage.
Cabin Pages
Back to Index for Timberframe Cabin pages.
Back to First Timberframe Cabin page (April-August 2006).
Back to Second Timberframe Cabin page (September - December 2006).
Back to Third Timberframe Cabin page (January- May 2007).
Back to Fourth Timberframe Cabin page (Summer 2007).
Back to Fifth Timberframe Cabin page (Fall 2007).
Back to Sixth Timberframe Cabin page (Winter/Spring 2008).
Back to Seventh Timberframe Cabin page (Summer 2008).
Back to the Eighth Timberframe Cabin page (Fall/Winter 2008-9).
Back to the ninth Timberframe Cabin page (Spring/Summer 2009).
Back to the tenth Timberframe Cabin page (Fall/Winter 2009/2010).
Back to the Eleventh Timberframe Cabin page (Spring/Summer 2010).
Forward to the Thirteenth Timberframe Cabin page (2012).
Forward to the Fourteenth Timberframe Cabin page (2013).
Forward to the Fifteenth Timberframe Cabin page (2014).
To the Sixteenth Timberframe Cabin page (2015).
To the seventeenth Timberframe Cabin page (2016).
My Links to Other People's Timberframe sites.
Useful Offsite Info (Open in new Windows) Fishing with Robert.
 Weather at nearby Old Battle Monitoring Station.
Weather Forecast for Encampment.
NOAH Weather Forecast for approximate cabin location from NOAH.
Southeast Wyoming Road Conditions.
Avalanche forecast for just south of here.
Link to Wyomingtalesandtrails site on are.
My Other Web Pages Trout Unlimited National Website.
 My Philosophy Page.
 My Woodworking Page.
 My Workbenches Page.
 My Old House Page.
 My Kitchen Cabinets Page.
 The Bathroom Remodel Page.
 My Father's Milling Machine.

Winter Weather.
After a late fall trip in 2010 I spent most of the winter not at the cabin. I did watch the weather monitor and at one point it told me it might get dozens of degrees below zero up there. When I next arrived I was able to check the hi/low recording thermometer. Sure enough, at 2:16 in the morning on February 2nd, the porch thermometer recorded a temperature of negative 29.6 degrees F. The coldest it got inside was negative 4.2 degrees at 10:29 later that same morning.
Actually, that made the indoor temperature not all that bad considering. I'd been worried that the anitfreeze in the drain would freeze and crack the trap at such extreme temperatures and that a bottle of scotch might also freeze and pop open. I need not have worried. I suspect that with the heat running it would even have been toasty - not that I would have liked getting to the cabin in such weather.
March Mushing


I had emailed my neighbor Alfred about a March trip but our schedules did not mesh. But he was able to tell me that his most recent visit was very snowy. In fact he could not recall a time when his cabin was as snow bound.
I skied up in mid-March. This time I brought skins for the skis rather than showshoes. The plan was to use them on the return trip. Skiing up to the turnoff was reasonably pleasant, though tiring as I was out of mountain shape. Skiing down from there to the cabin was difficult as the snow did not hold my weight well with the pack on my back. I'd crash through the crust, stop and fall. The whole trip took a bit over 4 hours for all six miles from the car. When I got here, the cabin looked as depicted above.
So I had to dig out before getting in to the cabin and then starting the stoves. This wasn't so bad in and of itself, but on top of the fatigue from the trip I was reasonably impressed that I was able to keep going. Once inside the wood stove was easy enough to start and the smoke seemed to make it out the snow covered top. The propane was a bit harder to start up even after I had carefully cleared the exhaust/intake pipes of snow. Still it got going well enough. The charge controller showed a relatively low battery charge so I used only a few lights. Cashews and sardines were dinner.
Digging out
In the morning I dug out under the solar panels. The snow had bent the mounting brackets to the two larger panels. When the sun came round the charge controller showed charging of mostly 1 to 3 amps, but it did reach 5 amps at some points. The battery voltage charged up to 12.4 volts before it got cloudy. Things don't seem optimal, but I can't tell if it is just not sunny enough or whether one of the panels is damaged. That will be work for later in the season.
Later I went looking for the experimental tubular wine cellar I give some details about on the eleventh cabin page. I found it with little trouble though the top was a foot or two below the snow. I was able to retrieve a bottle from one of the two pvc tubes and left the other for future retrieval. The experiment seems to have been a success. The wine was unfrozen and in good shape. The idea was to get the wine itself underground with an insulated plug just above it. Then run a rope to the top to pull these parts out when it comes time to use them in winter. Everything went as planned as the photos below show:


Tonight's dinner should be better than last night's cashews and sardines!
Skiing Out
I did manage to use the skins to ski up from the cabin to the (closed) road. I had to diagonal through the trees above our place rather than follow the road because some portions of the road are just too steep to follow easily. Of course cutting through the trees was itself no picnic. But I did make it out and I did spare myself the trouble of carrying snowshoes in to use on one small (but important) part of the trip.
Isn't That Deep (Enough)
OK, so we hit 11 (133 inches) feet there for a bit according the the snow monitor on March 26th.
Going to be a While to Get Access
So the snow is still well over 11 feet at the Old Battle snow monitor in late May. And the crews are not going to be able to clear Snowy Range Road, before Memorial Day. And they'll only start on Highway 70 after that is complete.And on May 31 there is still about 11 feet of snow, the plows have yet to start work, and part of Battle Highway (on the other side of the pass) has fallen off the mountain. I'll have to go check on conditions at the cabin in a while.
More Work But It Could Be Worse (or Water, Water Everywhere)
Alfred managed to get down to the cabin in early June and sent me these photos:


I went up the week of June 19th to have a look for myself. Alfred was able to meet me up there so we shared some pleasant meals in the evenings. Clearing Battle Highway wasn't yet completed and Saratoga was flooded. The road was not yet officially open, but the gate was and we could drive up to the turnoff. From there, snowshoes, sleds and boots served to carry stuff from the car to the cabin - about a two mile trip. Here are a couple of shots of Saratoga, the North Platte, and sandbags on the river.


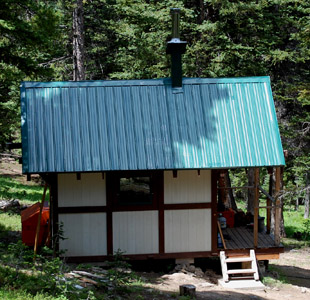
The cabin looked about as expected. There was no major animal infestation due to the hole in the roof where the chimney chase had separated from the roof. Or none except for a large flock of Millers Moths that made a good racket with their beating wings late in the evening.
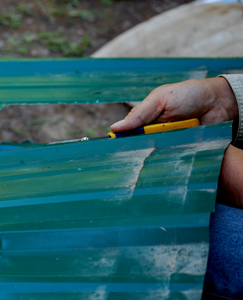
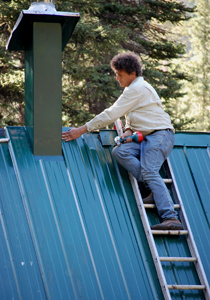
The chimney trouble is visible in the photos below. As you should be able to see, the snow actually pushed the chase down in the course of pulling on the chimney as it tried to slide from the roof. This led to crushing of the roof on the outside and cracking of the 3/4 inch plywood roof/ceiling. If you look carefully at the interior shot you can see the cracks in the plywood. The stove itself was also moved a considerable distance when the chimney tilted at the roof joint. Clearly a lot of force was applied to the chimney and indirectly the roof. In a way it is a surprise that it was not all pulled down. Probably the bottom couple of feet of the snow on the roof was a block of ice and it all came down at once without easily letting go of the chimney chase. Something had to give and it was the chase/roof connection.
With limited access and no real time, there wasn't much to do but to try to seal the gap between the chase and the roof. This involved tipping the whole thing back into position as well as that could be accomplished, and then sparaying expanding foam into the gap for now. I was lucky that the thawing snow had exposed our ladder so that I could do this from above on the roof. Later in the summer we'll attempt a more permanent repair or what you might call chimney 5.0. It looks to involve some metal fabrication. Anyway, here are the photos:


A Good Fishing Trip with Robert

In early July, together with my friend and notable philosopher Robert Johnson, I visited the cabin for a week of fishing amidst the still high (and even rising) waters of the North Platte River Valley. We did rather well on lesser known tributaries of the Platte and Encampment Rivers. (That's a fish Robert caught above.) Click the fish to access a page about that, or navigate to it using the sidebar menu.
More Water Trouble
It appears that a storm on July 19 washed out Snowy Range Road leading to the drowning deaths of 4 people trying to get out of a compground which was also threatened by flash flooding. It also took out an emergency vehicle with the Mayor of Saratoga inside, but he was finally rescued. The Denver Post has an article with details and some scary pictures (such as the photo below furnished by the Wyoming Highway Patrol and hosted on their site). It is a sad story.

The Saratoga Sun also has an article with more details on their site. And even the Washington post has picked it up.
We'll soon see how the storm treated the area around the cabin, which has been having some issues with erosion. The problems are with the road down to the cabin and not the cabin itself. My hard-working neighbor Mike Anderson nicely moved some dirt to reinforce the banks of the drainage ditch that was causing much of the problem. I hope that work held.
Another Chimney Repair
July also included a trip with Jenny that was mostly devoted to a new chimney repair strategy. It involved installing a steel box within which the chimney itself runs until it comes out at the top about four feet above where it penetrates the roof. Since these are not made commercially, I drew up a set of plans and had them fabricated. The kind folks at Bryant Heating and Air Conditioning on Cornhusker in Lincoln did the work for me. I think they must have enjoyed doing the unusual job because Ron in their sheet metal shop gave me lots of good help and time. On his advice we somewhat modified the design in my drawings below.
 (Click for pdf).
 (Click for pdf).
On his advice we omitted the tube inside and just used plates with holes wide enough for the chimney to fit through, letting the plates hold the chimney along with the factory designed box that projects down into the room from the ceiling. (That box is there in the previous chimney chases as well since the chimney requires it when going through combustible materials.) We also moved the large flange that was to be bolted to the roof deck up so that the tube would come down below the underside of the roof a bit. The idea is to lagbolt and throughbolt the large flange at the bottom of the unit to a triple reinforced roof deck, and also to move the chimney up just a bit higher on the roof so that it is truly at the peak on the top side. It all came out quite well as you can see in these photos:


The finished unit barely fit inside the new Corolla for the trip out west. As a neighbor pointed out, we wound up looking like something out of James Bond, at least until we closed the trunk.

Rather than give detailed commentary about the process I'll just post a series of photos showing the process:


So How Many Chimney Incarnations Has It Been?
One


Two


Three


Four

Battery Trouble
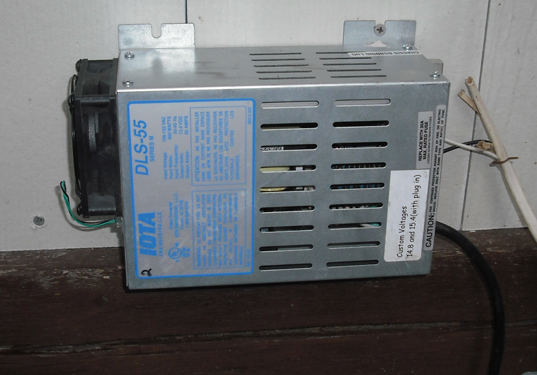
Earlier on this page I mentioned maximum battery voltages of 12.4 volts, not totally awful, but not optimal. By the time I got back for any length of time in the summer the voltages mostly stayed lower. Each battery section was equally charged but the usual charge fell below 12 volts. Battery PH also showed the batteries to be mostly discharged. So on the last trip up to work on the chimney, I swapped out the charge controller. The new one works but the symptoms remain - that's not the problem. Hmm.
So I spent some more money on a high capacity 120 volt battery charger I could run off the generator. And after a nice Philosophy conference in Boulder, I drove up to put it to use. Charging started at about 30 amps with the voltage at 11.7 volts. Over the course of two days listening to the generator and going nuts, the amparage dropped to about 5 amps and the voltage raised up to 12.9 or so. And the PH got closer to the expected value for batteries with some charge. Still, the roar of the generator took its toll and we did not get above about an 80% charge. That was to be expected if the batteries were in fact almost completely discharged, but it was not as much charge as I hoped to accomplish with that visit. I think that the charge controller kept me from charging at a higher rate when at voltages closer to normal. I could bypass it, but the controller does keep things from getting to hot or too gassy.

It will take another trip to get the whole job done.
I did fix a chair by replacing a metal part with one I fabricated while I was up there.


And I did find something to take home:

Labor Day Weekend
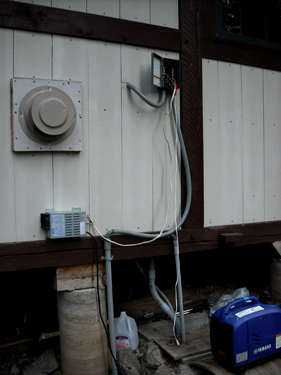
We did take another trip up for the labor day weekend, to work on the charger, to add a ventilator fan system to the battery box to vent hydrogen when we charge the batteries, and to work on adding an additional solar panel to keep the damn system up to charge.
These photos show (in order) the new lightning arrestor we added to the system at the point where the wires from the solar panels enter the cabin, two views of the ventilator fan unit that mounts on the outside of the cabin wall (made from pvc electrical boxes, a brushless muffin fan, and a few other parts), the controller inside which turns the fan on when the battery voltage reaches 14 volts (inside the box that also holds the inverter fuse and the fuse between the charge controller and the battery), and the whole inside charge control area now with a switch for turning the fan circuit on and off.


Prep Work
We also began work on installing yet another panel on a different tree so as to get some sun when the tree we've been mounting panels on is in the shade. This gave us reason to want to mount a panel really high up. It also gave us even more reason to cut down a dead tree next to the tree we were going to mount the new panel on. Here we have me felling that much taller (70 ft plus) dead subalpine fir so that we can put a panel on the spruce tree in the foreground next to it:

Or if you prefer action:
From there our neighbor Mike helped us skid the trunk sections to the log pile and to use a peavey and a cant hook to roll them to the top of the pile:


Panel Mounting and Adjusting
With the obstacles removed we used borrowed scaffolding to limb the tree to hold the panel high enough to avoid having limbs cast shadows on the panel. And then we mounted the 50 watt panel at least 20 feet up the tree. The brackets were made of a strap hinge at the top, and a set of supports made of aluminum angle stock pop riveted to support the panel at a relatively low angle so as to catch the winter sun.


 \
\
We also used the scaffolding to raise the lowest and largest of the existing panels higher in the tree on which it is mounted. As things had stood, this panel would get covered with snow when depths went above 8 feet or so. Now it will take at least an extra foot to reach that point. We also added reinforcement to the brackets holding it in place and retensioneded the cables which are designed to keep the panel from blowing in a high wind. Here is Jenny with our finished work:

A Hard Charging Trip
In late September I made another trip out to connect the new panel to the system at the combiner box. This was accomplished rather easily with not much to photograph. Another goal was to try and charge the batteries some more using the genarators. It was a lot of listening to motors run and a little futzing around with various other projects. Again, not too photogenic. And the result still left the batteries down about 10% from fully charged.
A Last Mid-October Visit
I also took a last quick visit for Fall break. Unfortunately trouble from work caught me by email and I wasted most of a day in Laramie taking care of it. There was snow on the ground and it was risky to get the van more than a mile or so from the cabin. So I carried in lots of winter provisions from there. Still, the cabin was pretty and the stream coming down from the road photogenic.

 A bad storm was coming in early, so the whole visit wasn't really even two days. I did have time to trim out the chimneybox on the inside of the cabin, which doesn't look like much, but given the guage of the trim it was hard on the hands working the tin snips to adjust the piece to new dimensions. And I was able to make a porch board removeable so as to make the propane shutoff accessible in winter (I hope). Once again I ran the chargers, though the larger one needed a tuneup and was not used. By the end of the visit the batteries were fully charged judging by the voltage, and a bit low judging by the PH of 1250. Another thing we'll have to wonder about while we're away.


My neighbor, Mike, sent me this photo of one of the cabins up the hill, taken last Spring. The snow that damaged my chimney did many worse things to this cabin. It has in fact since been repaired with a new truss roof. But this was not trivial work, I think, since the photos show the collapsing roof pushed the walls of the cabin outward. I hate to think what my cabin would look like if it took such damage. My guess is that it would not be long before various creatures had found the food inside and taken up residence. Hopefully things won't come to this, though we seem to be due another record year with ocean currents similar to last and the predicted effects of climate change putting more moisture into the air. Anyway, here is Mike's picture:

Links To My Other Cabin Pages
Back to Index of the Timberframe Cabin pages.
Back to first Timberframe Cabin page (April-August 2006).
Back to Second Timberframe Cabin page (September - December 2006).
Back to third Timberframe Cabin page (January - May 2007).
Back to the fourth Timberframe Cabin page (Summer 2007).
Back to the fifth Timberframe Cabin page (Fall 2007).
Back to the sixth Timberframe Cabin page (Winter/Spring 2008).
Back to the seventh Timberframe Cabin page (Summer 2008).
Back to eighth Timberframe Cabin page (Fall/Winter - 2008-2009).
Back to ninth Timberframe Cabin page (Spring/Summer 2009).
Back to tenth Timberframe Cabin page (Fall/Winter 2009/2010).Back to eleventh Timberframe Cabin page (Spring/Summer 2010).
Forward to the Thirteenth Timberframe Cabin page (2012).
Forward to the Fourteenth Timberframe Cabin page (2013).
Forward to the Fifteenth Timberframe Cabin page (2014).