
LINKS
email me Back to My Homepage.
Cabin Pages
Back to Index for Timberframe Cabin pages.
On to First Timberframe Cabin page (April-August 2006).
On to Second Timberframe Cabin page (September - December 2006).
On to Third Timberframe Cabin page (January- May 2007).
On to Fourth Timberframe Cabin page (Summer 2007).
On to Fifth Timberframe Cabin page (Fall 2007).
On to Sixth Timberframe Cabin page (Winter/Spring 2008).
On to Seventh Timberframe Cabin page (Summer 2008).
On to the Eighth Timberframe Cabin page (Fall/Winter 2008-2009).
On to the Ninth Timberframe Cabin page (Spring/Summer2009).
On to the Tenth Timberframe Cabin page (Fall/Winter 2009-2010).
On to the eleventh Timberframe Cabin page (Spring/Summer 2010).
On to the Twelfth Timberframe Cabin page (2011).
Forward to the Thirteenth Timberframe Cabin page (2012).
Forward to the Fourteenth Timberframe Cabin page (2013).
Forward to the Fifteenth Timberframe Cabin page (2014).
To the sixteenth Timberframe Cabin page (2015).
To the seventeenth Timberframe Cabin page (2016).
My Links to Other People's Timberframe sites. Useful Offsite Info Fishing with Robert.
 Weather at nearby Old Battle Monitoring Station.
Weather Forecast for Encampment.
NOAH Weather Forecast for approximate cabin location from NOAH.
Southeast Wyoming Road Conditions.
Avalanche forecast for just south of here.
Link to Wyomingtalesandtrails site on are.
My Other Web Pages Trout Unlimited National Website.
 My Philosophy Page.
 My Woodworking Page.
 My Workbenches Page.
 My Old House Page.
 My Kitchen Cabinets Page.
 The Bathroom Remodel Page.
 My Father's Milling Machine.
Oh Oh!

A final trip to close in the cabin and finish it before winter was planned spanning from the 22nd of September until the work is complete in October. Winter, however, seemed to arrive before the Fall Equinox. They had over a foot of snow at the cabin site, so I put off my trip by a few days beyond the 22nd. When I arrived on the September 25th I found:
 The road covered with snow but passable.
 The tent collapsed with a shattered pole, but fixable.
 And the cabin covered with snow that has been melting over the past several days.
Work continued.
.
Woodstove Installation

With this weather, installing the wood stove (a Jotul F602) was an obvious priority. I chose this stove both because it is about the smallest made (and this is a small cabin) and because they have sold over a million of this basic model, so that parts should not be hard to find should I need them.
Infuriatingly the installation manual for this stove is wrong about what must go underneath. And Jotul's subsequent instructions by FAX and again on the phone, that 24 gage sheet metal was all that was needed, also turns out to be wrong according to an email I have since gotten from them. They now want 3/8 inch of non-combustible material according to an email I got. Luckily, I had already decided on overkill with a full inch including 1/8 inch sheet metal under the stove. So I should be set even if they change the requirements yet again. My advice for others with this stove is to call and email the factory and be patient waiting for their response. (They took over a week to get me the final word on the new requirements.) Don't take my word for it.
Other than the installation instructions SNAFU, I like the stove. The small size makes it ideal for this application, and the window in the front of the stove is pleasant to look at in a small cabin like this one on a dark and lonely night.
Filling in the Walls
(Yes, I know I omitted a section on the flooring, but what is there really to take pictures of? The basic timberframe was supplemented with 2 by 6 dimensional lumber to support the floors, and the inside was decked with 3/4 inch plywood subfloors and the porch with redwood 2 by 6 lumber. But there isn't much to photograph in that.)
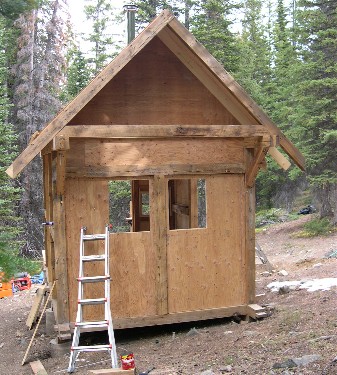
The walls on the other hand, have some visual interest. Rather than cover the timberframe on the outside (as many such structures do), I've decided to fill in the open areas in such a way that the beams will still show on the outside. This requires firring strips to be nailed or screwed to the inside of the frame and plywood to be screwed to these. Eventually the plywood will be covered on the outside with house wrap and siding will go on over the housewrap.
These are some images show the firring strips (made of 2 x 2s) and the finished result when plywood is applied (this image is from the back of the cabin).

Roofing
The cabin will have a metal roof. The roofing comes in 3 foot wide by about 10 foot long sheets which are screwed to the roof deck, or in this case to sleepers of 2 x 4s which are filled in with foam insulation. The first two photos show the South or uphill side. The first of these photos shows where the inch and a half foam is installed between two by four sleepers. Not all is filled in between the sleepers because there is really no point in insulating the roof of the porch or the overhangs that are not over interior space. The third of these photos shows the North side roofed but without the drip trim and most of the cap. The little bit of that that was done was done in the dark the night before another early snow storm chased us out. There's something bracing about riding the peak of a 12/12 roof twenty or so feet up off the ground in the fading light.
The photo also shows the two windows which are meant for installation in the side walls, but which will have to wait for next year given the approach of winter.


.
Run Off by Another Early Storm
These last photos shows how the finished work on the cabin looks at the moment. We were able to sleep in it for the first time on October 7, 2006. The generator died and would not restart on the 8th. Luckily we have hand tools for most operations, but recharging the screw-guns needed to finish the roof now had to be done with an inverter using the car. On October 9 a cold front predicted to bring in up to a foot of snow moved in. Since we are literally at the end of a road that most people would only navigate with a four wheel drive, this meant more trouble. We raced to complete what we could and pack up before the snow hit. Our neighbor Mike helped us immensely in this process. Snow was starting to fall as we headed out, but we made it up the steep dirt road just fine.


A Last Attempt to Finish Up This Year
The plan was to go back one more time this season during the latter half of October with a rented 4WD and finish up some details, such as boarding up the windows, and trying to finish up the roofing on the peak of the roof, reinforce the walls just a bit, and board up the windows for winter.
Upon my arrival things looked like this:


I was able to snowshoe in several times over the course of a week, but aside from losing my glasses while I shoveled a place to park before snowshoeing in, boarding up the windows for the coming heavy snows, caulking some holes to keep out varmints, and rescuing the cement board siding from where the snow-load would have crushed it, there was not much else I could do. The columns from the porch to the roof trusses are there to support the winter snowfall and can be removed for the summer season. I'm inclined to do that, since I think the shape of the cabin is nicer without the columns. But this might be subject to debate.
Things left to do on the structure include, finishing the roof, trimming some of the wooden parts to length, siding over the plywood with cement board (to retard likely fires from spreading to the structure), installing the side windows, putting in a stairway to the porch deck, staining and painting the exterior wood (I'm having some trouble getting the color right on the wood trim which seems to look orange for reasons I don't understand), insulating the walls and covering the insulation with boards I hope to mill from trees on the site. I also hope to put in a small solar electric system to brighten our nights. Sadly, this will have to wait until next summer.
Sure is Pretty on a Sunny Day in Winter
So this is how things looked when I left. The first shot is looking south from the cabin porch, the second shows the cabin with the siding now safely stored on the porch, and the last is a view from the road out.


.
December Conditions
My neighbor, Alfred, and I skied into his place in early December. It is about four miles from the spot where the main road closes for the winter to his cabin where we stayed. From there it is about a mile to my cabin. The day after skiing into Alfred's cabin we made our way down to my cabin to check out the snow conditions. The cabin looked like this:


Later on we skied up to Doane Peak to look over the scenery. The photo below shows Alfred and the view:

Miraculously on our ski trip back down the mountain, I found my glasses where I had lost them in the snow more than a month previously. Also miraculously I did not fall down on the descent.
If you have any curiosity about the weather and road conditions near the cabin, you can check out the weather in Encampment and at the Sierra Madre Mountains as well as road conditions at the links on the sidebar. The Old Battle Site should be a relatively good reflection of the conditions at my site which is less than a mile away and about 1000 feet lower in elevation.
.
 Continued on the Third Timberframe Cabin Page(Part 3 - 2007).
Back to Index for Timberframe Cabin pages.
Back to First Timberframe Cabin page (April-August 2006).
On to Third Timberframe Cabin page (January- May 2007).
On to Fourth Timberframe Cabin page (Summer 2007).
On to Fifth Timberframe Cabin page (Fall 2007).
On to the sixth Timberframe Cabin page (Winter/Spring 2008).
On to the seventh Timberframe Cabin page (Summer 2008).
On to the eighth Timberframe Cabin page (Fall/Winter 2008-2009).
On to the ninth Timberframe Cabin page (Spring/Summer 2009).
On to the Tenth Timberframe Cabin page (Fall/Winter 2009-2010).
On to the eleventh Timberframe Cabin page (Spring/Summer 2010).
On to the Twelfth Timberframe Cabin page (2011).
Forward to the Thirteenth Timberframe Cabin page (2012).
Forward to the Fourteenth Timberframe Cabin page (2013).
Forward to the Fifteenth Timberframe Cabin page (2014).