
LINKS
email me Back to My Homepage.
Cabin Pages
Back to Index for Timberframe Cabin pages.
Back to First Timberframe Cabin page (April-August 2006).
Back to Second Timberframe Cabin page (September - December 2006).
Back to Third Timberframe Cabin page (January- May 2007).
Back to Fourth Timberframe Cabin page (Summer 2007).
Back to Fifth Timberframe Cabin page (Fall 2007).
Back to Sixth Timberframe Cabin page (Winter/Spring 2008).
On to the Eighth Timberframe Cabin page (Fall/Winter 2008-2009).
On to the Ninth Timberframe Cabin page (Spring/Summer 2009 coming soon).
On to the Tenth Timberframe Cabin page (Fall/Winter 2009-2010).
On to the eleventh Timberframe Cabin page (Spring/Summer 2010).
On to the Twelfth Timberframe Cabin page (2011).
Forward to the Thirteenth Timberframe Cabin page (2012).
Forward to the Fourteenth Timberframe Cabin page (2013).
Forward to the Fifteenth Timberframe Cabin page (2014).
 Fishing with Robert.
 Weather at nearby Old Battle Monitoring Station.
Weather Forecast for Encampment.
NOAH Weather Forecast for approximate cabin location from NOAH.
Southeast Wyoming Road Conditions.
Avalanche forecast for just south of here.
Link to Wyomingtalesandtrails site on are.
My Other Web Pages Trout Unlimited National Website.
 My Philosophy Page.
 My Woodworking Page.
 My Workbenches Page.
 My Old House Page.
 My Kitchen Cabinets Page.
 The Bathroom Remodel Page.
 My Father's Milling Machine.

Winter precipitation this year was much higher than usual, with some reports that records were set. At one point the nearby snow monitor reported 131 inches on the ground. Snowmelt was still filling ditches and streams in early July.

After 7 years of drought this was a good thing, but not enough to stem the beetle kill of lodgepole pines, shown below in the view of neighboring mountainsides across the valley from us.

The First Summer Trip
I was out of the country from early May to late June at a metaethics seminar at the Institute for Advanced Studies at the Hebrew University of Jerusalem. Needless to say that cut into my time to do anything at the cabin. So the first trip up was the first part of July. We found that the cabin had weathered the snowmelt well and that there were no mouse infestations -- a worry because the wet winter had led to prolific mice enough of which carried hantavirus to cause two deaths in the county. The immediate work to be done included a better assessment of the snow damage to the chimney, siding the cabin if the siding had survived the heavy snows (it had) and limbing trees for fire safety. Plus of course all the little things you need to do to stay up there while you are working, such as refill the water tank, rearrange things to make room for humans, get the ramp up to the porch, etc.
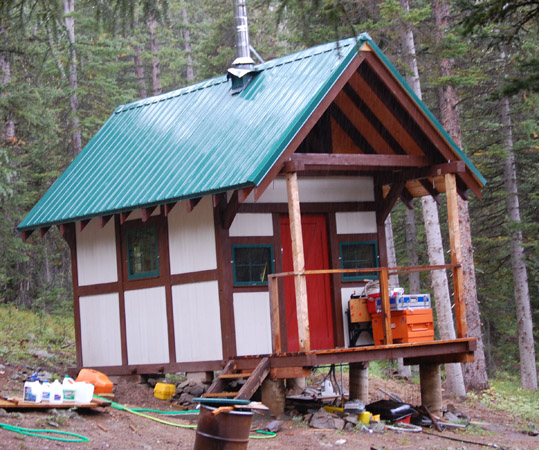
The chimney needed a new cap for obvious reasons.
 It will also need a new 4 foot section where the old one has a crimp on the outside, and some side support that won't add places for snow to get a better grip. It isn't obvious how easy it will be to do all this and it is obviously going to cost some money.
Limbing Trees
Beetle-killed lodgepole pines in the surrounding forests make fire defensibility a priority. The idea is to make structures relatively easy for firefighters to defend if there is a forest fire. So you want a clear area around structures and firebreaks between clusters of trees and other measures to slow fire spread. The suggested fire safety protocols require limbing trees within 90 feet of structures for their first ten feet off the ground. This is to prevent ground fires from climbing the lower dead limbs to become crown fires, should we ever be so unlucky as to have a ground fire. I spend a good part of an afternoon limbing some of the trees closest to the cabin and Jenny spent quite a bit more time at it, after which she took the limbs to piles uphill and away from the cabin. Eventually we'll get rid of the piles as well, but for now this increases our safety somewhat. It was a lot of hard work on her part, as the pictures only begin to show.


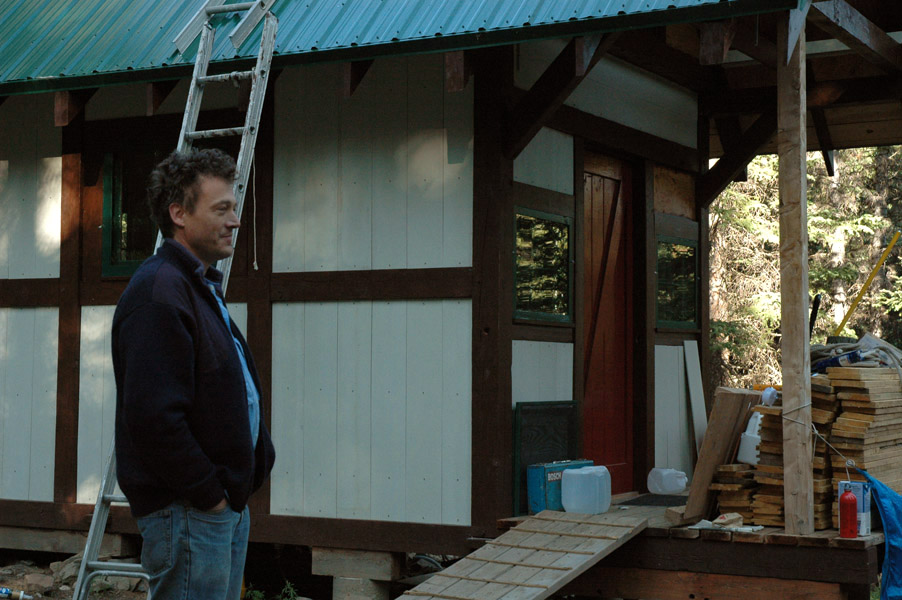
Siding the Cabin
While Jenny finished staining the cabin timbers not quite finished the previous year, I was finally able to get to siding over the plywood sheathing in between those timbers. Remarkably the siding survived its second winter under the snow so that I could use it. You'll recall I purchased it the first year but the snows came too early and I had to pull it by sled to the cabin site for storage. Last year's schedule also went to Hell and again I could not do the siding. So we supported the piles from underneath as well as we could (roughly every 18 inches) and laid what scrap wood we had over the top to protect it from the weight of the snow. Given the 10 foot snow depth which apparently collapsed a neighbor's newly constructed deck, and my inability to do much to take snow off the siding pile on my trip out in May, I was pessimistic about the siding remaining unbroken. But I guess we did something right.
The siding is grey primed cementboard, which I had chosen for its fire resistance. Underneath I've caulked the sheathing joints and applied housewrap for additional wind and critter resistance. Below are photos of the work in progress. The first four shots take us up to the point where we left in early July. The others are of the nest trip out.


Work and Visitors
I made another trip out in mid-July to finish the siding and do various other odd jobs. To be honest the last several siding pictures are actually from that trip. But I also used the trip to add extra batteries, add trim and additional lights, pour cement, and fix the chimney hopefully for good. There are a couple of photos of the first two immediately below:


During this visit I was visited by my colleague David Henderson and his wife Marianne. They helped me with several projects, including the chimney repair and David kindly hauled many bags of concrete down the hill to be used in making a footing/landing for stairs to the porch and also in making a spring box later on. The photos below show those two projects:


A Fishing Interlude

Not long after the visit I drove back to Lincoln to meet my friend and well known metaethicist Robert Johnson for a flyfishing trip in Yellowstone and here at the cabin. Since the trip is not strictly speaking about the cabin, photos are linked on a separate page.
A Springbox
The next trip, in mid-August, was to develop one of the springs below the cabin into a water source. We had filed for a permit last year and have until the end of this calendar year to complete the project and register our water right with the state once we have put it to "beneficial use".
I spent a lot of time on the web looking at springbox plans. Most of these seemed to be designed for locations in the third world to protect local water sources. Because they were designed for low tech locations they were the right sort of thing for our purposes. All were of poured concrete of some sort, and John Leeke of the OldHouse mailing list suggested I consider a round design. I spent about a year scratching my head about how to do that. I thought of buying a cement culvert and sticking it on end, but was dissuaded by the weight involved and the difficulty of transporting it to the spring site. One day Jenny was reading a crafts book with a bench project partly of cast cement. That gave me an idea which morphed into another idea and eventually became the design below. I would cast it in place using sonotubes.
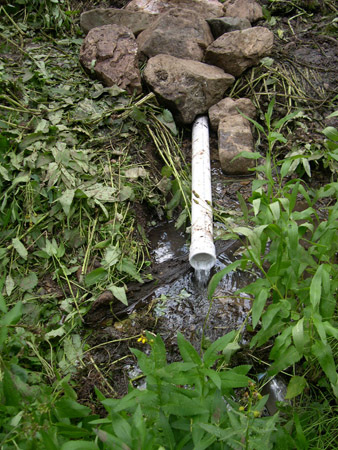
First though, I had to dig out the spring and then provide a diversion path for the water to leave the hole while I poured the box. This involved finding the highest place in the marshy bog around our springs where water came to the surface and then digging down about 2 1/2 feet. Then a trench had to be dug to allow water to escape the hole while the concrete was poured. Below you can see the hole, and a picture of my nubby fingers after scraping gravel out of the drainage channel. My fingernails were literally worn off bit by bit and I now have wicked calluses on the ends of my fingers.


Next forms had to be set in place containing rebar and wire to reinforce the concrete. And a pipe had to go under the form and out through the trench to allow the water to exit. This pipe could later be plugged to raise the water level in the box, or alternatively water could eventually be taken directly from the pipe. The photos below show the forms being set in place. The wood inside the inner sonotube was to prevent pressure from the concrete from collapsing it inward. The outer tube was quite flimsy from recent rains so I reinforced it with duct tape before commencing to fill the forms. PVC outlet and overflow tubes were inserted from the inside to the outside just before pouring the concrete.


Gravel was dropped into the back bottom of the tube wall to provide a permeable wall for water to come if from the uphill side. Then I mixed 9 or so 80 lb bags of concrete in a wheelbarrow with a shovel and filled the forms from there, resulting in this:


The last photo is actually from a somewhat later trip when I made an appropriate lid for it. A close-up of the unpainted lid, made of plywood with an aluminum band around it to discourage porcupines from chewing on it is below. Come next spring we will have the water tested for safety. In the meantime we can boil it or put it to use for other purposes than drinking.

Stairs and Porch Work
This trip was also used to build stairs up to the cabin porch and to move the support posts forwards to give us more room when the railings are installed. You'll recall that the posts had been hastily and temporarily set in place at the end of the first fall of work on the cabin as bad weather was already at work. After this past winter is was very clear that they would need to be permanent. So I used threaded rod from the top and bottom bolted to nuts inserted in holes on either end of the posts to anchor them more securely and permanently. They don't look quite as good this far forward as I think they looked where they were previously placed. But they will allow us to use the whole porch in their current positions, and that is worth having. The photos below show the post-moving in mid-project and the finished placement and stairway.


Railings installation waited for the last trip of the summer detailed immediately below.
Porchwork Continued
Labor day weekend allowed Jenny and me to make it out for a quick trip of hard work. One component of that was finishing the springbox by finishing the lid pictured in that section above. Another component was finishing the porch railings. This necessitated moving the pine boards we had stored on the porch to a locker in town for the winter to give us room to work. Two sixty mile round trips took most of a day to accomplish, but we did get some other things done that day. And it was pleasant to have some room on the porch once again.
The next day was rainy and Jenny was not feeling so well. Still the porch was mostly covered so I could do what was needed. I had already moved the uprights on the previous trip. Now the task was to attach a center support in the middle of the front side, and a support next to the stairs. These were attached with threaded rod run partly up the length of the posts to a nut and then down through the beams supporting the porch to another nut to tighten them down. When these were torqued down the result was surprisingly solid. Railings were then morticed into the main porch support posts and lag screwed at a level to match the top of the additional posts. These rails were redwood 2 x 4 dimensional lumber and they were then in turn lag-screwed to the support posts. The results look as pictured below and are surprisingly solid.


Interior Work
The trip also allowed us to install a pantry cabinet on the wall to store food. The cabinet is roughly 35 inches tall and 15 inches wide with shelves spaced to allow large 3 liter canning jars for staples and other places for shorter containers. It was constructed at home and hauled out to the cabin site. The wood is pine to match the walls, but the wood has been planed and sanded. Construction techniques are much like those used for our kitchen cabinets at home (detailed at www.oldhousechronicle.net). Basically this is a simple frame and panel design of the sort that has been around for a very long time. The results look like this:


I was also able to add a shelf above the window for more storage space as pictured below:

Along with our new vintage cooler this means we now have a bit of a kitchen in the cabin!

More Chimney Work
Finally we had time to add a more rigid support to the chimney so that it would be less likely to move in heavy snows. A piece of galvanized angle iron was screwed to the roof on the opposite side from the chimney, extending up to bolt to a band support strapped around the chimney itself in line with the end of the galvanized angle iron strap. The result looks like this and feels much more rigid than any previous arrangement I was able to test:

For a busy summer with 6 weeks in Israel, two conferences and ten thousand miles behind the wheel of a car, we got a lot done. Work will continue into the fall, but things are in pretty good shape at this point.
On to the eighth Timberframe Cabin page (Fall/Winter 2008-2009).
On to the ninth Timberframe Cabin page (Spring/Sumer 2009 ? Coming soon!).
On to the Tenth Timberframe Cabin page (Fall/Winter 2009-2010).
On to the eleventh Timberframe Cabin page (Spring/Summer 2010).
On to the Twelfth Timberframe Cabin page (2011).
Forward to the Thirteenth Timberframe Cabin page (2012).
Forward to the Fourteenth Timberframe Cabin page (2013).
Forward to the Fifteenth Timberframe Cabin page (2014).
To the sixteenth Timberframe Cabin page (2015).
To the seventeenth Timberframe Cabin page (2016).
Back to Index of the Timberframe Cabin pages.
Back to first Timberframe Cabin page (April-August 2006).Back to Second Timberframe Cabin page (September - December 2006).
Back to third Timberframe Cabin page (January - May 2007).
Back to the fourth Timberframe Cabin page (Summer 2007).
Back to the fifth Timberframe Cabin page (Fall 2007).
Back to the sixth Timberframe Cabin page (Winter/Spring 2008).